How to Perform CPR: Hands-Only
- oliver591
- Dec 13, 2021
- 3 min read

Importance of CPR
Cardiopulmonary resuscitation (CPR) is a lifesaving technique. It aims to keep blood and oxygen flowing through the body when a person’s heart and breathing have stopped.
CPR can be performed by any trained person. It involves external chest compressions and rescue breathing.
CPR performed within the first six minutes of the heart stopping can keep someone alive until medical help arrives.
Although rescue breathing techniques were used to revive drowning victims as early as the 18thcentury, it wasn’t until 1960 that external cardiac massage was proven to be an effective revival technique. The American Heart Association (AHA) then developed a formal CPR program.
While there’s no substitute for formal CPR training taught by certified instructors, the AHA recently recommended that people who haven’t received CPR training initiate “hands-only” CPR. This method removes the rescue breathing and is easy to perform, proven to save lives, and better than waiting until trained help arrives.
Performing hands-only CPR
People without CPR training can perform hands-only CPR by following the steps below.
1. Survey the scene
Make sure it’s safe for you to reach the person in need of help.
2. Check the person for responsiveness
Shake their shoulder and ask loudly, “Are you OK?” For an infant, tap the bottom of the foot and check for a reaction.
3. If the person isn’t responsive, seek immediate help
Call 911 or your local emergency services if the person isn’t responsive. You can also ask someone else to call. If you’re alone and believe the person is a victim of drowning, or if the unresponsive person is a child from age 1 to 8, begin CPR first, perform it for two minutes, then call emergency services.
4. Check the heart with an automated external defibrillator (AED)
If an AED is readily available, use it to check the person’s heart rhythm. The machine may also instruct you to deliver one electric shock to their heart before beginning chest compressions.
If the person is a child from age 1 to 8, perform CPR first for two minutes before checking their heart with an AED. Use the device’s pediatric pads if they’re available.
The use of an AED in infants under 1 years old isn’t conclusive or strongly recommended.
If an AED isn’t immediately available, don’t waste time looking for the device. Start chest compressions immediately.
5. Locate hand position

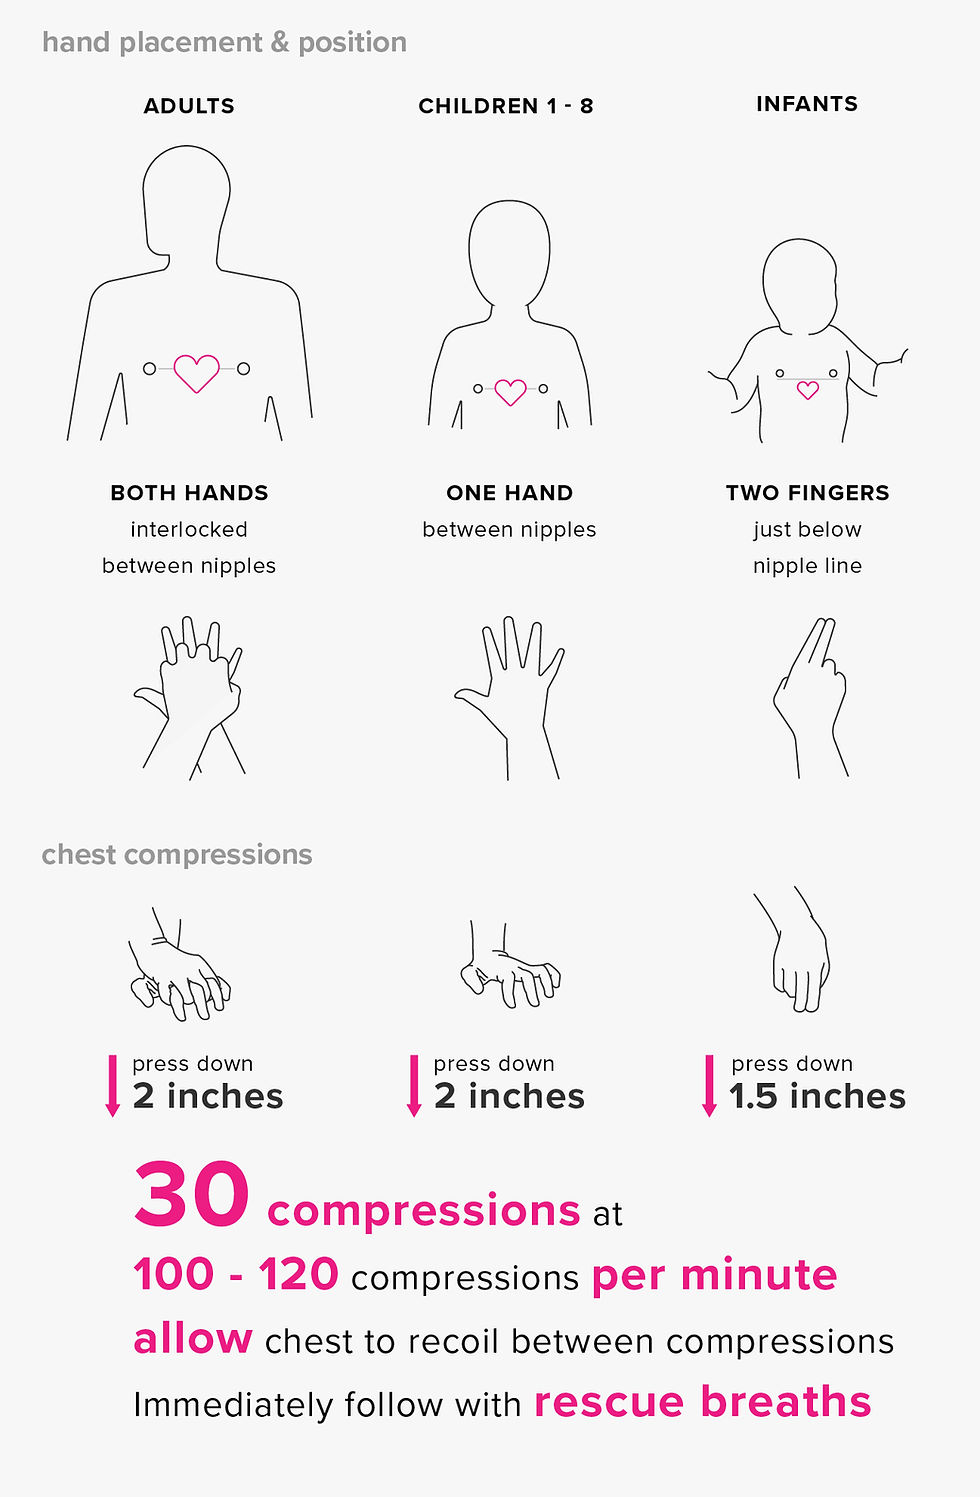
If the person is an adult, place the heel of one of your hands in the center of their chest, between the nipples. Put your other hand on top of the first. Interlock your fingers so they’re drawn up and the heel of your hand remains on their chest.
For children from age 1 to 8, use just one of your hands in the center of their chest.
For infants, place two fingers in the center of their chest, slightly below the nipple line.
6. Begin compressions
To start compressions on an adult, use your upper body to push straight down on their chest at least 2 inches. Perform these at a rate of 100 to 120 compressions per minute. Allow their chest to recoil between compressions.
For children from ages 1 to 8, push straight down on their chest about 2 inches at a rate of 100 to 120 compressions per minute. Allow their chest to recoil between compressions.
For an infant, push straight down on their chest 1½ inches at a rate of 100 to 120 compressions per minute. Once again, let the chest recoil between compressions.
7. Continue compressions
Repeat the compression cycle until the person starts to breathe or medical help arrives. If the person begins to breathe, have them lie on their side quietly until medical assistance is on the scene.
Learn, Enjoy and Save Life. HealthForce Training Center offer services such as Basic Life Support (BLS), Advance Cardiovascular Life Support (ACLS), Pediatric Advance Life Support (PALS), CPR AED, Pediatric First Aid CPR AED and First Aid CPR AED. Read more of our blogs.
Source(s):


AV在线看 AV在线看;
自拍流出 自拍流出;
国产视频 国产视频;
日本无码 日本无码;
动漫肉番 动漫肉番;
吃瓜专区 吃瓜专区;
SM调教 SM调教;
ASMR ASMR;
国产探花 国产探花;
强奸乱伦 强奸乱伦;
代发外链 提权重点击找我;
蜘蛛池 蜘蛛池;
谷歌马甲包/ 谷歌马甲包;
谷歌霸屏 谷歌霸屏;
谷歌霸屏 谷歌霸屏
蜘蛛池 蜘蛛池
谷歌快排 谷歌快排
Google外链 Google外链
谷歌留痕 谷歌留痕
Gái Gọi…
Gái Gọi…
Dịch Vụ…
谷歌霸屏 谷歌霸屏
负面删除 负面删除
币圈推广 币圈推广
Google权重提升 Google权重提升
Google外链 Google外链
google留痕 google留痕
代发外链 提权重点击找我;
游戏推广 游戏推广;
Fortune Tiger Fortune Tiger;
Fortune Tiger Slots Fortune…
谷歌马甲包/ 谷歌马甲包;
谷歌霸屏 谷歌霸屏;
מכונות ETPU מכונות ETPU;
;ماكينات اي تي بي…
آلات إي بي بي…
ETPU maşınları ETPU maşınları;
ETPUマシン ETPUマシン;
ETPU 기계 ETPU 기계;
google seo google seo技术飞机TG-cheng716051;
03topgame 03topgame
gamesimes gamesimes;
Fortune Tiger Fortune Tiger;
Fortune Tiger Slots Fortune Tiger…
Fortune Tiger Fortune Tiger;
EPS машины EPS машины;
Fortune Tiger Fortune Tiger;
EPS Machine EPS Cutting Machine;
EPS Machine EPS and EPP…
EPP Machine EPP Shape Moulding…
EPS Machine EPS and EPP…
EPTU Machine ETPU Moulding Machine
EPS Machine EPS Cutting Machine;